こんにちは。NewITソリューション部の井口です。
今回は、OpenAIのFunction Callingについてご紹介します。
Function Callingを利用することで、OpenAIが提供するモデルが外部の様々な機能へアクセスできるようになります。
前提
以下の人を対象にしています。
- Function Callingを利用したい人
- Node.jsでのTypeScript実行環境を構築できる人
- Chat Completion APIで単純なモデルとの対話を実装できる人
環境
今回は以下の環境を利用していきます。
- Azure OpenAI Serviceの
gpt-4o-mini(バージョンは2024-07-18) - Node.js v22.14.0
- TypeScript v5.8.2
- JS/TS用Azure OpenAI SDK v2.0.0
- OpenAI SDK v4.87.3
Azure OpenAI Serviceを利用していますがOpenAIが提供するAPIでも再現できるかと思います。
Function Callingとは?
Function Callingとは、OpenAIのChat Completionでモデルが状況に応じてアプリ開発者側が用意した機能への入力を作成し、その入力に対する出力を受け取ってその後の応答を生成する機能です。
機能自体はアプリ開発者側が用意し、モデルの要求に対してその機能を実行する必要があります。モデルはあくまで機能を呼び出し、その出力を受け取ることになります。
したがって、アプリ開発者が実装可能な機能についてはFunction Callingを通してモデルから呼び出すことができます。
Function Callingの基本
Function Callingを利用したアプリのでの処理の流れは、一部簡略化していますが以下のような流れになります。
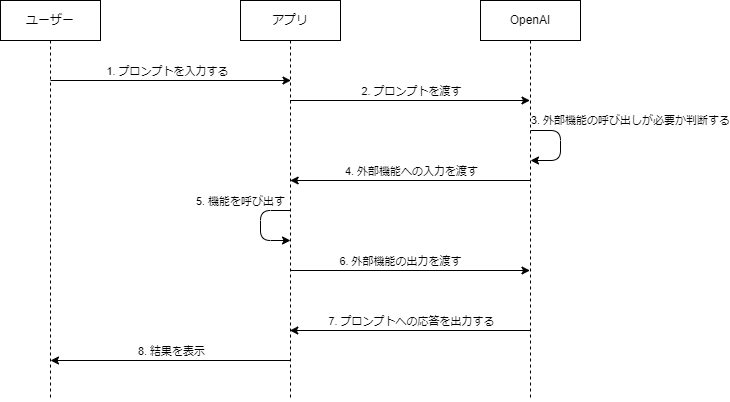
注意点が2点あります。
一度に複数の機能を呼び出す可能性がある
画像の4の部分で、複数機能の呼び出しを要求されることがあります。
このとき、5では4で要求されたすべての機能を呼び出して結果を取得し、6で一度にモデルに結果を返す必要があります。
モデルが連続して機能を呼び出す可能性がある
ユーザーの入力やアプリの実装によっては6の後に再度3に戻ったのちに4の外部機能の呼び出しを要求されることがあります。
一度機能を呼び出したら次に必ず7の最終的な応答になるとは限らないので、APIのレスポンスから次に行う処理をその都度判断するように実装する必要があります。この後の例では連続した機能の呼び出しを処理する必要があるので参考になれば幸いです。
Function Calling実践例
今回はGoogleのGeocoding APIとOpenWeatherのCurrent Weather DataのAPIを利用して特定の場所の天気を取得できるチャットボットを作ります。
利用するサービスについて
Google Geocoding API
Googleが提供するジオコーディング(住所から緯度と経度を取得すること)を行うためのAPI。
- 概要:https://developers.google.com/maps/documentation/geocoding/overview
- 利用するためにはGoogle Cloudへの登録と支払い情報の追加が必要。
- 10000req/月まで無料(https://developers.google.com/maps/billing-and-pricing/pricing)
OpenWeather
気象に関するデータを集めている企業。今回はこの企業が提供している無料のAPIを利用する。
- 概要:https://openweathermap.org/current
- 利用するためにアカウントの作成が必要
実装
Node.jsでのプロジェクトのセットアップとTypeScriptのセットアップ、各種パッケージのインストールは完了しており、OpenAIのURLとAPIキーも取得済みであるものとして進めていきます。
1. サービスへのアクセス
利用するサービスの使い方についての詳細な説明は省きますが、以下のようなラッパーを利用していきます。
fetchLatlng関数で緯度と経度の取得を、fetchWeather関数で指定された場所の天気を取得しており、これらをそれぞれ外部機能として登録し、モデルからの呼び出しができるようにしていきます。
Google Geocoding APIへのアクセス
const GOOGLE_MAPS_API_KEY = '<<Google Geocoding APIのAPIキー>>';

function getGeocodingEndpoint(address: string) {
  return `https://maps.googleapis.com/maps/api/geocode/json?address=${address}&key=${GOOGLE_MAPS_API_KEY}`;
}

type Latlng = {
  lat: number
  lng: number
}

/**
 * 住所情報から緯度と経度を取得する
 * @param address 住所
 * @returns 緯度経度
 */
export async function fetchLatlng(address: string): Promise<Latlng> {
  const endpoint = getGeocodingEndpoint(address);
  const res = await fetch(endpoint)
  const data = await res.json()

  return data.results[0].geometry.location
}
OpenWeatherへのAPIアクセス
const API_KEY = "<<OpenWeatherへのAPIキー>>"

function getEndpoint(lat: number, lng: number) {
  return `https://api.openweathermap.org/data/2.5/weather?lat=${lat}&lon=${lng}&units=metric&lang=ja&appid=${API_KEY}`
}

type Weahter = {
  id: number,
  main: string,
  description: string,
  icon: string
}
type WeatherDetailedInfo = {
  temp: number
  feels_like: number
  temp_min: number
  temp_max: number
  pressure: number
  humidity: number
}

type Wind = {
  speed: number
  deg: number
}

type Clouds = {
  all: number
}

type WeatherResponse = {
  weather: Weahter[],
  main: WeatherDetailedInfo,
  wind: Wind,
  clouds: Clouds
}

/**
 * 緯度と経度からその土地の現在の天気を取得する
 * @param lat 緯度
 * @param lng 経度
 * @returns 現在の天気
 */
export async function fetchWeather(lat: number, lng: number): Promise<WeatherResponse> {
  const endpoint = getEndpoint(lat, lng)
  const res = await fetch(endpoint)
  const data = await res.json()
  return data
}
2. 基本的なチャットでのやり取り
まずはFunction Callingなしでモデルと対話できるようにしていきます。
import { AzureOpenAI } from "openai";
import { ChatCompletionMessageParam } from "openai/resources";
import { stdin, stdout } from "node:process";
import { createInterface } from "node:readline/promises";

const OPENAI_URL = "<<OpenAIのAPIエンドポイント>>";
const OPENAI_KEY = "<<OpenAIのAPIキー>>";
const OPENAI_API_VERSION = "2024-05-01-preview";
const OPENAI_DEPLOYMENT = "gpt-4o-mini";

const client = new AzureOpenAI({
  endpoint: OPENAI_URL,
  apiKey: OPENAI_KEY,
  apiVersion: OPENAI_API_VERSION,
  deployment: OPENAI_DEPLOYMENT,
});

// この配列にユーザーとモデルの対話を記録していく。
const messageHistory: ChatCompletionMessageParam[] = [
  {
    role: "system",
    content: "あなたは便利なアシスタントです。",
  },
];

// Chat Completion APIにリクエストを送る関数
async function ai(...messages: ChatCompletionMessageParam[]) {
  messageHistory.push(...messages);
  const result = await client.chat.completions.create({
    model: "gpt-4o-mini",
    messages: messageHistory,
  });

  const choice = result.choices[0];
  messageHistory.push(choice.message);

  return choice;
}

// ユーザーの入力をモデルに渡し、レスポンスを処理する
// ここでユーザーに外部機能を呼び出すのか最終的な結果を返すのかなどを処理していきます
async function chat(prompt: string) {
  let choice = await ai({ role: "user", content: prompt });

  // まずはモデルから取得した結果をそのまま返す
  return choice.message.content;
}

// ユーザーの入力
const rl = createInterface({ input: stdin, output: stdout });

// Node.jsだとTop-level awaitが使えないので非同期処理は関数化して再帰呼び出しする形にしました
async function app() {
  const input = await rl.question("> ");
  const response = await chat(input);
  console.log(response);

  await app();
}

app().finally(() => rl.close());
3. Function Callingを利用することをモデルに伝える
Function Callingを実装する場合、まずはモデルにリクエストを投げる際にどのような機能を呼び出すことができるのかを定義する必要があります。
具体的には、リクエストにtoolsというパラメータを追加します。詳細な仕様はOpenAIのドキュメントを参照してください。
toolsは仕様書にある通りオブジェクトの配列です。今回は以下のプロパティを持つオブジェクトを渡します。
type- 常に
"function"で固定(2025/03/18現在)
- 常に
functionname- 機能の名前。この値でモデルが実行する機能を指定してくる。
description- 機能の内容を説明する文章。モデルがこの機能の役割を理解するために使う。
parameters- この機能で受け付ける入力の型定義。JSON Schemaで定義する。
- JSON SchemaについてはJSON Schemaのすゝめという記事がわかりやすいです。
今回は以下のようにtoolsを定義しました。
const tools: ChatCompletionTool[] = [
  {
    type: "function",
    function: {
      name: "get_current_weather",
      description: "Get current weather.",
      parameters: {
        type: "object",
        properties: {
          location: {
            type: "object",
            properties: {
              lat: {
                type: "number",
                description:
                  "The latitude of the location to get the weather for",
              },
              lng: {
                type: "number",
                description:
                  "The longitude of the location to get the weather for",
              },
            },
          },
        },
      },
    },
  },
  {
    type: "function",
    function: {
      name: "get_location",
      description:
        "Get latitude and longtitude from user query using Google Maps Geocoding API.",
      parameters: {
        type: "object",
        properties: {
          query: {
            type: "string",
            description:
              "The address to get the location for. This is passed to the Google Maps Geocoding API as an address of a query parameter.",
          },
        },
      },
    },
  },
];toolsの型定義がChatCompletionToolsとなっていますが、これはOpenAIのSDKから提供されているtoolsの型定義です。
toolsの中身を見ていきましょう。
今回は2つの機能をモデルに提供しています。1つが現在の天気を取得するget_current_weather、もう1つが住所情報から緯度と経度を取得するget_locationです。
get_current_weather
nameとdescriptionは定義されているとおりです。parametersは、lat、lngという2つの数値を持つプロパティにもつlocationというオブジェクトがあり、それをプロパティとして持つオブジェクトをget_current_weatherへの入力として定義しています。
わかりにくいですが、要は下のようなTypeScriptの型で表現されるような値を入力として渡します。
type GetCurrentWeatherParam = {
  location: {
    lat: number, // 緯度
    lng: number  // 経度
  }
};
get_location
これもparametersをTypeScriptの型で表現するならば以下のようになります。
type GetLocationParam = {
  query: string // ユーザーの入力から抽出した住所情報
}
API呼び出しの修正
これを2で定義したaiという関数の中でAPIリクエストに含めてあげます。
// 先ほど定義したtools
const tools: ChatCompletionTool[] = [
  {
    type: "function",
    function: {
      name: "get_current_weather",
      description: "Get current weather.",
      parameters: {
        type: "object",
        properties: {
          location: {
            type: "object",
            properties: {
              lat: {
                type: "number",
                description:
                  "The latitude of the location to get the weather for",
              },
              lng: {
                type: "number",
                description:
                  "The longitude of the location to get the weather for",
              },
            },
          },
        },
      },
    },
  },
  {
    type: "function",
    function: {
      name: "get_location",
      description:
        "Get latitude and longtitude from user query using Google Maps Geocoding API.",
      parameters: {
        type: "object",
        properties: {
          query: {
            type: "string",
            description:
              "The address to get the location for. This is passed to the Google Maps Geocoding API as an address of a query parameter.",
          },
        },
      },
    },
  },
];

async function ai(...messages: ChatCompletionMessageParam[]) {
  messageHistory.push(...messages);
  const result = await client.chat.completions.create({
    model: "gpt-4o-mini",
    messages: messageHistory,
    tools, // リクエストに渡す
  });

  const choice = result.choices[0];
  messageHistory.push(choice.message);

  return choice;
}
さて、ここまでで以下の部分まで実装が完了しました。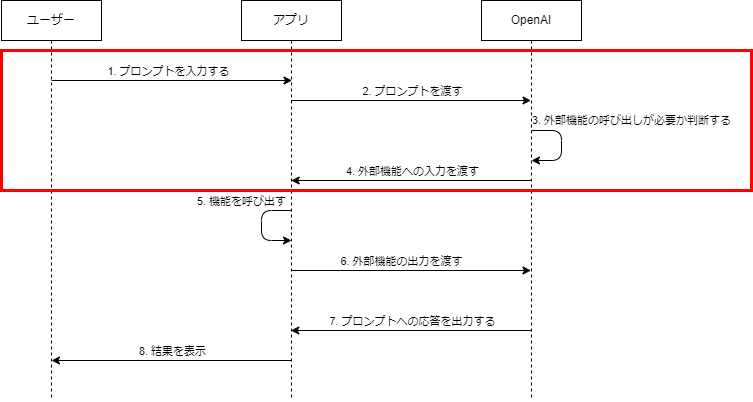
4. 外部機能を実行し、モデルに結果を返却する
ここからは実際に機能を実行し、モデルにその結果を返却する部分を実装していきます。
async function chat(prompt: string) {
  let choice = await ai({ role: "user", content: prompt });

  // まずはモデルから取得した結果をそのまま返す
  return choice.message.content;
}ai関数の戻り値となっているchoiceですが、これはOpenAIのChat Completion APIのレスポンスの中のchoicesという配列の一つ目の要素をそのまま返しているものです。
choicesにはAPIへのリクエストをもとにモデルが生成した出力が含まれています。リクエストでnというパラメーターを指定するとモデルから複数パターンの応答が返ってきますが、指定しなかった場合応答は1つになります。
choicesが持つプロパティで今回利用するのはstop_reasonとmessageです。
stop_reasonモデルの出力が止まった理由- 取りうる値にいくつか種類がありますが、今回は
"stop"と"tool_calling"を使います。"stop"- 会話の終了。ユーザーの入力に対して、何の問題もなく返答を生成できた状態。
"tool_calling"- 外部機能の呼び出し。
message- モデルが生成した応答
- いくつかのプロパティを持つオブジェクト(今回利用するものだけ紹介します)
contentfinish_reasonが"stop"だったとき、入力に対する応答になる。
tool_callsfinish_reasonが"tool_calling"だったとき、実行する機能やパラメータを持つオブジェクトの配列になる。- 一度に複数機能呼び出すとき、この配列が複数の要素を持つことになる。
以下のようにchat関数を変更していきます。
async function chat(prompt: string) {
  let choice = await ai({ role: "user", content: prompt });

  // finish_reasonがstopになったときに無限ループ終了
  while (true) {
    switch (choice.finish_reason) {
      case "stop":
        return choice.message.content;
      case "tool_calls":
        // 型エラー回避のため
        if (!choice.message.tool_calls) {
          throw new Error("tool_calls must not be null");
        }
        // <-- ここで外部機能の呼び出しを行う -->
        break;
      default:
        break;
    }
  }
}
モデルのエラーで出力の生成が止まった時などを考慮できていないですがあくまで例なのでこのまま進めます。
注意するのは、外部機能の呼び出しが完了した後でも再度レスポンスをチェックして処理を行うようにしている点です。。先ほど紹介した注意点の「モデルが連続して機能を呼び出す可能性がある」ということを考慮し、finish_reasonが"stop"になるまでAPIの呼び出しを繰り返すようにしています。
再帰を使えばさらにすっきりした実装にできそうですね、、、
何はともあれこれで実際に外部機能の呼び出しを行う部分の実装に移れます。
改めてになりますが、Chat Completionのレスポンスのchoicesの要素に含まれるfinish_reasonが"tool_calling"だったとき、同じくchoicesの要素に含まれるmessageにはtool_callsというオブジェクトの配列があります。
tool_callsの要素となるオブジェクトは以下のプロパティを持ちます。
type"function"で固定
functionname- 実行する機能の名前、リクエストで渡したtoolsに含まれるもの。
arguments- 機能に渡す入力。リクエストで渡したtoolsで定義した型のJSONの文字列。
id- 機能の呼び出し1つに対して付与される一意のID。外部機能の出力をモデルに渡す際に使う
tool_callsの要素すべてについて、それぞれfunctionオブジェクトのnameを見てどの機能を実行するか判断し、入力をパースするなどして機能に渡して実行します。最後に機能から取得した結果をモデルに渡すと最終的なユーザーへの出力を取得できます。
今回はtoo_callsを受け取って機能を実行する部分を関数にし、それをchat関数から呼び出す形にしました。
まずはtool_callsを処理する関数を見てみましょう。
async function callTools(
  toolCalls: ChatCompletionMessageToolCall[]
): Promise<ChatCompletionToolMessageParam[]> {
  // 外部機能の実行結果をこの配列に入れていく
  const results: ChatCompletionToolMessageParam[] = [];
  // tool_callsの要素それぞれに対して処理を行う
  for (const toolCall of toolCalls) {
    // switchで機能を判断
    switch (toolCall.function.name) {
      case "get_current_weather":
        const {
          location: { lat, lng },
        } = JSON.parse(toolCall.function.arguments);
        // 最初に定義した外部機能を実行
        const current = await fetchWeather(lat, lng);
        // 実行結果を保存
        results.push({
          role: "tool",
          tool_call_id: toolCall.id, // モデルから受け取ったidをそのまま渡す
          content: JSON.stringify(current),
        });
        break;
      case "get_location": // ここもget_current_weatherと同様
        const query = JSON.parse(toolCall.function.arguments).query;
        const location = await fetchLatlng(query);
        results.push({
          role: "tool",
          tool_call_id: toolCall.id,
          content: JSON.stringify(location),
        });
        break;
    }
  }

  return results;
}functionのnameを見て機能を判断し、argumentsをパースして機能に渡して結果を保存しています。
この関数をchat関数から呼び出します。
async function chat(prompt: string) {
let choice = await ai({ role: "user", content: prompt });
while (true) {
switch (choice.finish_reason) {
case "stop":
return choice.message.content;
case "tool_calls":
if (!choice.message.tool_calls) {
throw new Error("tool_calls must not be null");
}
// 外部機能の呼び出し
const toolResults = await callTools(choice.message.tool_calls);
// 機能の出力をAPIに渡す
choice = await ai(...toolResults);
break;
default:
break;
}
}
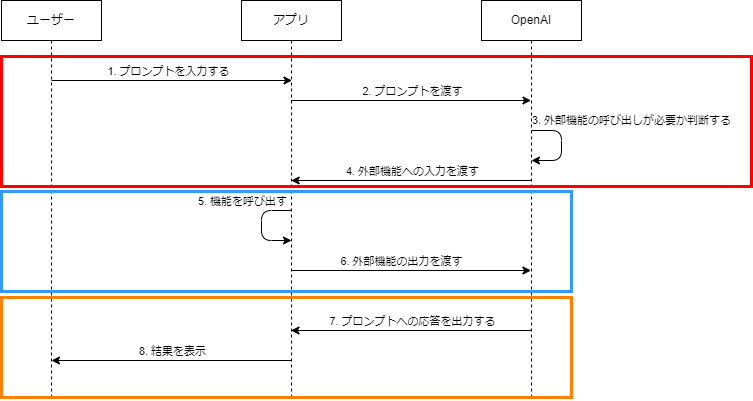
}ここまでで、下の図の5と6を実装しましたが、オレンジ色の枠についてはfinish_reasonがstopだったときにユーザーに出力を返す部分であるため、既に実装済みになります。これで一通り実装が完了しました。
作成したアプリを動かしてみると以下のようになるはずです。問題なく動くかと思います。
以下が今回実装したアプリの全体です。各サービスのAPIについては前述のコードを参照してください。
import { AzureOpenAI } from "openai";
import {
  ChatCompletionMessageParam,
  ChatCompletionMessageToolCall,
  ChatCompletionTool,
  ChatCompletionToolMessageParam,
} from "openai/resources";
import { stdin, stdout } from "node:process";
import { createInterface } from "node:readline/promises";
import { fetchLatlng } from "./geocoding";
import { fetchWeather } from "./weather";

const OPENAI_URL = "<<OpenAIのAPIエンドポイント>>";
const OPENAI_KEY ="<<OpenAIのAPIキー>>";
const OPENAI_API_VERSION = "2024-05-01-preview";
const OPENAI_DEPLOYMENT = "gpt-4o-mini";

const client = new AzureOpenAI({
  endpoint: OPENAI_URL,
  apiKey: OPENAI_KEY,
  apiVersion: OPENAI_API_VERSION,
  deployment: OPENAI_DEPLOYMENT,
});

async function callTools(
  toolCalls: ChatCompletionMessageToolCall[]
): Promise<ChatCompletionToolMessageParam[]> {
  const results: ChatCompletionToolMessageParam[] = [];
  for (const toolCall of toolCalls) {
    switch (toolCall.function.name) {
      case "get_current_weather":
        const {
          location: { lat, lng },
        } = JSON.parse(toolCall.function.arguments);
        const current = await fetchWeather(lat, lng);
        results.push({
          role: "tool",
          tool_call_id: toolCall.id,
          content: JSON.stringify(current),
        });
        break;
      case "get_location":
        const query = JSON.parse(toolCall.function.arguments).query;
        const location = await fetchLatlng(query);
        results.push({
          role: "tool",
          tool_call_id: toolCall.id,
          content: JSON.stringify(location),
        });
        break;
    }
  }

  return results;
}

const tools: ChatCompletionTool[] = [
  {
    type: "function",
    function: {
      name: "get_current_weather",
      description: "Get current weather.",
      parameters: {
        type: "object",
        properties: {
          location: {
            type: "object",
            properties: {
              lat: {
                type: "number",
                description:
                  "The latitude of the location to get the weather for",
              },
              lng: {
                type: "number",
                description:
                  "The longitude of the location to get the weather for",
              },
            },
          },
        },
      },
    },
  },
  {
    type: "function",
    function: {
      name: "get_location",
      description:
        "Get latitude and longtitude from user query using Google Maps Geocoding API.",
      parameters: {
        type: "object",
        properties: {
          query: {
            type: "string",
            description:
              "The address to get the location for. This is passed to the Google Maps Geocoding API as an address of a query parameter.",
          },
        },
      },
    },
  },
];

const messageHistory: ChatCompletionMessageParam[] = [
  {
    role: "system",
    content: "あなたは便利なアシスタントです。",
  },
];

async function ai(...messages: ChatCompletionMessageParam[]) {
  messageHistory.push(...messages);
  const result = await client.chat.completions.create({
    model: "gpt-4o-mini",
    messages: messageHistory,
    tools,
  });

  const choice = result.choices[0];
  messageHistory.push(choice.message);

  return choice;
}

async function chat(prompt: string) {
  let choice = await ai({ role: "user", content: prompt });

  while (true) {
    switch (choice.finish_reason) {
      case "stop":
        return choice.message.content;
      case "tool_calls":
        if (!choice.message.tool_calls) {
          throw new Error("tool_calls must not be null");
        }
        const toolResults = await callTools(choice.message.tool_calls);
        choice = await ai(...toolResults);
        break;
      default:
        break;
    }
  }
}

const rl = createInterface({ input: stdin, output: stdout });

async function app() {
  const input = await rl.question("> ");
  const response = await chat(input);
  console.log(response);

  await app();
}

app().finally(() => rl.close());
最後に
OpenAIからリリースされてからそれなりの時間が経った機能ですが、AIに五感と手足を与えられるような仕組みでとても面白い機能です。一方で、自分で利用してみようとすると考えることが多く、最後まで実装してみるまで挙動を確認しづらいので少し面倒ではあったなと感じています。
最近似たような機能だとAnthropicが仕様を公開しているMCPが、コーディング用のAIエージェントであるClineで利用できるということで話題になっていますよね。
今後も生成AIを活用してさらに多くのことを実現できるようになるだろうと思うとワクワクします。
最後に、弊社にご興味をお持ちいただけましたらお気軽にお問い合わせいただけると幸いです。
 (←参考になった場合はハートマークを押して評価お願いします)