この記事は更新から24ヶ月以上経過しているため、最新の情報を別途確認することを推奨いたします。
はじめに
本記事ではBicepを用いてMicrosoft Azure上にWindowsVMをデプロイする手順について記載します。
今回は例として、別記事「Bicepでドメインに参加したWindowsVMのコード記述方法」で紹介されているコードを用いてデプロイを行います。Bicepについてやコードの記載方法については当該記事をご参照ください。
デプロイの前提条件
デプロイを行うために必要な準備について確認していきます。
環境構築
Azure CLI・Bicep CLIをインストールします。
- Azure CLIのインストーラーをダウンロードし、インストールを実行します。
ダウンロード先・手順参考 : https://learn.microsoft.com/ja-jp/cli/azure/install-azure-cli-windows?tabs=azure-cli - 下記コマンドを実行しBicep CLIをインストールします。
az bicep install
使用するコード
前述の通り、こちらの記事で紹介されているコードを使用します。検証の都合上、OSのバージョンを変更しています。
デプロイするVMの名称と管理者アカウントのログイン情報・ドメイン管理者のログイン情報はコード中には記載しません。この場合、デプロイを実行する際に都度パラメータを入力して設定する必要があります。
VM名についてはコードを編集せずに任意の名称のVMを作成できるようにするために、資格情報についてはセキュリティ上の観点から今回はこのように設定します。
また、既存リソースの名称などのパラメータは以下のものを用いることとします。
リソースグループ:bicep-rg
VNet:bicep-vnet
ドメイン:bicepdomain.com
OU:bicep-vm
コードのファイル名は任意ですが、ここでは”VM-domain-join.bicep”としておきます。
@description('The name of the administrator of the new VM.')
param adminUsername string

@description('The password for the administrator account of the new VM.')
@secure()
param adminPassword string

@description('Unique public DNS prefix for the deployment. The fqdn will look something like \'<dnsname>.westus.cloudapp.azure.com\'. Up to 62 chars, digits or dashes, lowercase, should start with a letter: must conform to \'^[a-z][a-z0-9-]{1,61}[a-z0-9]$\'.')
@minLength(1)
@maxLength(15)
param dnsLabelPrefix string

@description('Existing VNET that contains the domain controller')
param existingVnetName string = 'bicep-vnet'

@description('Existing subnet that contains the domain controller')
param existingSubnetName string = 'default'

@description('Public IP address name')
param publicIPAddressName string = '${dnsLabelPrefix}-pip'

@description('The FQDN of the AD domain')
param domainToJoin string = 'bicepexample.com'

@description('Username of the account on the domain')
param domainUsername string

@description('Password of the account on the domain')
@secure()
param domainPassword string

@description('The name of the storage account.')
param storageAccountName string = uniqueString(resourceGroup().id, deployment().name)

@description('Location for all resources.')
param location string = resourceGroup().location

resource existingVirtualNetwork 'Microsoft.Network/virtualNetworks@2021-02-01' existing = {
  name: existingVnetName
}

resource existingSubnet 'Microsoft.Network/virtualNetworks/subnets@2021-02-01' existing = {
  parent: existingVirtualNetwork
  name: existingSubnetName
}

resource publicIp 'Microsoft.Network/publicIPAddresses@2021-02-01' = {
  name: publicIPAddressName
  location: location
  properties: {
    publicIPAllocationMethod: 'Dynamic'
    dnsSettings: {
      domainNameLabel: dnsLabelPrefix
    }
  }
}

resource storageAccount 'Microsoft.Storage/storageAccounts@2021-04-01' = {
  name: storageAccountName
  location: location
  kind: 'Storage'
  sku: {
    name: 'Standard_LRS'
  }
}

resource nic 'Microsoft.Network/networkInterfaces@2021-02-01' = {
  name: '${dnsLabelPrefix}-nic'
  location: location
  properties: {
    ipConfigurations: [
      {
        name: 'ipconfig1'
        properties: {
          privateIPAllocationMethod: 'Dynamic'
          publicIPAddress: {
            id: publicIp.id
          }
          subnet: {
            id: existingSubnet.id
          }
        }
      }
    ]
  }
}

resource virtualMachine 'Microsoft.Compute/virtualMachines@2021-03-01' = {
  name: dnsLabelPrefix
  location: location
  properties: {
    hardwareProfile: {
      vmSize: 'Standard_D4as_v4'
    }
    osProfile: {
      computerName: dnsLabelPrefix
      adminUsername: adminUsername
      adminPassword: adminPassword
    }
    storageProfile: {
      imageReference: {
        publisher: 'MicrosoftWindowsServer'
        offer: 'WindowsServer'
        sku: '2019-Datacenter'
        version: 'latest'
      }
      osDisk: {
        name: '${dnsLabelPrefix}-OsDisk'
        caching: 'ReadWrite'
        createOption: 'FromImage'
        managedDisk: {
          storageAccountType: 'StandardSSD_LRS'
        }
      }
      dataDisks: [
        {
          name: '${dnsLabelPrefix}-DataDisk'
          caching: 'None'
          createOption: 'Empty'
          diskSizeGB: 1024
          lun: 0
        }
      ]
    }
    networkProfile: {
      networkInterfaces: [
        {
          id: nic.id
        }
      ]
    }
    diagnosticsProfile: {
      bootDiagnostics: {
        enabled: true
        storageUri: storageAccount.properties.primaryEndpoints.blob
      }
    }
  }
}
resource virtualMachineExtension 'Microsoft.Compute/virtualMachines/extensions@2021-03-01' = {
  parent: virtualMachine
  name: 'joindomain'
  location: location
  properties: {
    publisher: 'Microsoft.Compute'
    type: 'JsonADDomainExtension'
    typeHandlerVersion: '1.3'
    autoUpgradeMinorVersion: true
    settings: {
      name: domainToJoin
      ouPath: 'OU=bicepVMs,DC=bicepexample,DC=com'
      user: '${domainToJoin}\\${domainUsername}'
      restart: true
      options: '3'
    }
    protectedSettings: {
      Password: domainPassword
    }
  }
}
既存リソースのデプロイ
Azure上に既存リソースとして必要なリソースグループ・VNet・VM(ADサーバー)をデプロイし、ADを構築します。今回は詳細な手順は割愛し、結果のみ掲載します。
リソースグループ・VNet・ADサーバー
ドメイン・OU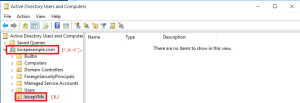
デプロイ手順
Azureにログインし、Bicepコードを用いてリソースをデプロイ後、結果を確認するまでの流れを記載します。
- ログイン
以下コマンドを実行します。ブラウザでログイン画面が開くので、デプロイに使用するアカウントでログインします。az login
- サブスクリプションの選択・確認
デプロイに使用するサブスクリプションを選択します。以下コマンドを使用します。# 利用できるサブスクリプションの情報をtable形式で表示
az account show --output table
# 使用するサブスクリプションを選択
az account set --subscription "(サブスクリプションID)" - デプロイ実行
リソースグループと使用するbicepファイルを指定し、以下コマンドを実行します。az deployment group create --resource-group bicep-rg --template-file VM-domain-join.bicep
前述の通り、コードに入力していないパラメータは入力が求められるので、適宜入力します。

- 結果の確認
VMがデプロイされ、ドメインに参加していることを確認します。
VMのデプロイ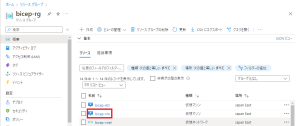
ドメイン参加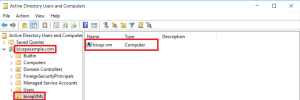
まとめ
本記事ではドメイン参加したVMを作成する場合を例に、Bicepを用いてMicrosoft Azure上にWindowsVMをデプロイする手順について記載しました。
今回は単一のVMとそれに関連するリソースのみをデプロイしましたが、必要に応じて任意の個数のVMを同時にデプロイできるようにするなど拡張を行うことで、より効率的にAzureのリソースを作成できます。
 (この記事が参考になった人の数:1)